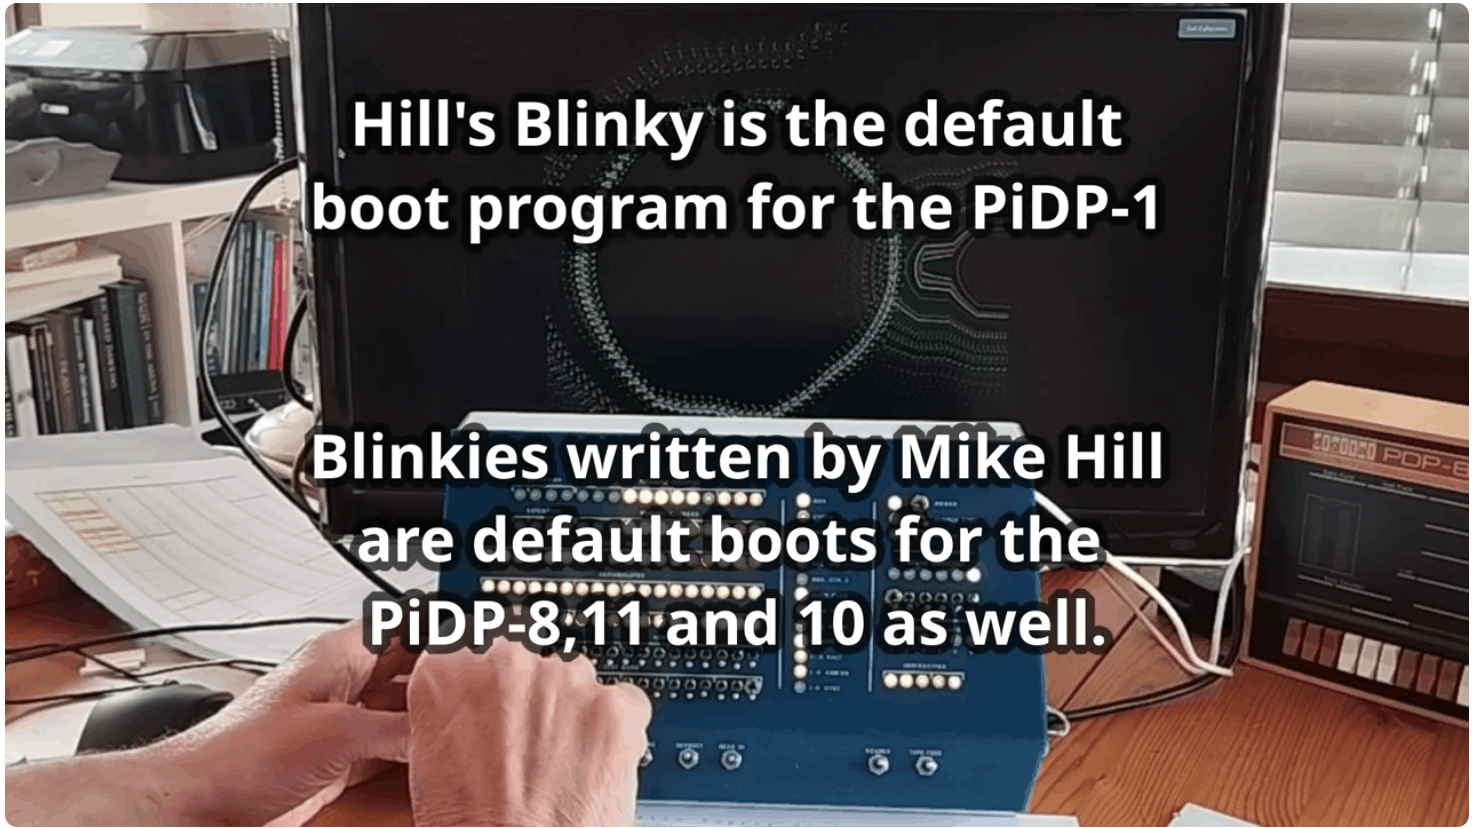
Mike Hill wrote Blinky programs for the PDP-8, 11, 10 and 1; they often grace the PiDP replica series at their default boot mode. It lights up the front panels in a pretty way without having to boot an operating system.
However, their real purpose is educational: to show in a very concise way how you program these machines.
This page gives an overview, to show why studying Blinkies is worth some time. There is much more to Blinkies than meets the eye. To the right, we show the Minsky Chaos easter egg hidden in Blinky-1. But all the Blinkies have interactive settings and non-obvious features.
That's only one reason to have a look at Blinky code and documentation. More important is that they are written to give a quick flavour of the machine's instruction set, the programming style, and some hacker style coding tricks that might surprise you.
For people who are completely new to assembly programming, this might be a steep Hill (pun intended) to climb. Read the DEC CPU handbooks a little bit first. But with the smallest amount of background, you will easily read Mike's commented code, provided in the source code boxes below.
PDP-1 Blinky: DPkaos graphical easter egg
(variation on Minsky, only in recent version!)
So, even if you have no intention to do any machine language programming on your machine, it is still fun to look. There are 'Hill's Blinky' boot modes on all the PiDPs, but this page contains them all - and might have the latest updated versions too.
PDP-1 Blinky
Mike's latest and greatest Blinky - so we start here. Blinky-1 is supplied as a ready-to-run paper tape. The code runs to over 6000(!) lines, partly because Blinky-1 is not a small program, but mostly because the source code is written as a tutorial. It assumes some basic knowledge of assembly language in general, if you know even the littlest about assembly code, it is easy reading and will teach you some elegant tricks.
How to use
This is the Blinky-1 help page. It will be typed out on the PDP-1 typewriter if you set Sense Switch 4
when you load the paper tape. You might have to scale the font size (Ctrl-+/- on the GUI to read it all. Beware, it takes a while to type out, before the machine continues with running Blinky itself. On a real PDP-1, of course, you would print it out once, tear off the paper and keep it... If you want to skip the printout and 'get to Blinky', just set Sense Switch 4 to off again.
B L I N K Y - 1   K i n e t i c   P o e t r y   o n   t h e   P D P - 1
-----------------------------------------------------------------------
TW0>    *fun *Special function   SENSE SWITCH (SSn) ON ->
TW1>     cAC  Complement AC      SS1 = RIM-load halts CPU after loading
TW2>     cIO  Complement IO      SS2 = Restart BLINKY-1 if changed
TW3>     pPF  PF pattern (0,1)   SS3 = Don't use extended memory
TW4>     pAC  AC pattern (0,1)   SS4 = Print HELP text to the console
TW5>     pIO  IO pattern (0,1)   SS5 = Set tick (TK) speed from TW6-17
TW6-8>   sPF  PF speed (x sCK)   SS6 = CRT display (TYPE 30) enabled
TW9-11>  sAC  AC speed (x sCK)   --------------------------------------
TW12-14> sIO  IO speed (x sCK)   TW=135xxx -> Easter eggs     (Try SS6)
TW15-17> sCK  Basic clock speed  TW=77xxxx -> Flash all lamps (See SS5)
-----------------------------------------------------------------------
TEST WORD (TW) settings to try (begin with SS6=OFF) ->
135037  BLINKY-1 will 'read' you it's own binary code (SS6=ON after)
330000 'big fast loop'        010000 'reversal'
070000 'fast rotation'        000320 'bouncing'
TYPE 30 CRT display 'Easter egg' -> Turn SS6=ON and set the TW to ->
135007 'rocket'        136007 'missile'        122007 'sky rockets'
131007 'rockets'       137007 'dots'           123007 'streak'
133007 'satellites'    127007 'sky streaks'    121007 'streaks'
132007 'missiles'      126007 'fireworks'      TW0=ON to end Easter egg
Blinky is controlled through the SENSE and TEST WORD switches.
- Assuming all your TW switches are off, the program shows the Big Fast Loop light pattern. Many other patterns are possible, experiment with the TW switches. The main 4 patterns are shown in the help text: Big Fast Loop, Reversal, Fast Rotation and Bouncing.
- Speed: TW15-17 (rightmost 3 switches) regulate the main software 'clock' that Blinky is ticking on. To the left, TW12-14 add a delay to whatever is flowing through the IO register lights, and to the left of that, TW9-11 add delays on flow through the accumulator lights.
- The program flags are animated as well. And of course, audio output is connected to the PF1-4 lights. Thus, if you enable the audio on your machine, you'll hear the pops every time the PF1-4 lights are (un)set. That's how audio on the PDP-1 works, there's nothing more to it. And still it can play music :-). Play with the clock (TW15-17) and the PF pattern (TW3) to experiment.
On to the
graphic 'easter eggs'. Assuming all TW switches are off, then:
- SS6 enables the display mode. Then, Set ADDRESS switches to 4 and set SS2 because things get confusing and this will let you use STOP/START to properly reset Blinky.
(To explain, setting ADDRESS to 4 then pressing START will restart BLINKY-1 (better to use ADDRESS 3000). Changing SS2 from OFF to ON or ON to OFF -then- changing the TW will also restart BLINKY-1)
- you'll now see random noise on the display. Blinky is just outputting whatever is in the AC and IO registers on the display. Press STOP, then START. You see the diagonal flash, which you should see as Blinky's reset flash.
- set TW to 135000. This drops you in the easter eggs, and you get the 'lone satellite' first. Set to 135007, you'll change its direction. Then set to 131007: multiple rockets. See the other effects in the help file. Leave the easter eggs by toggling switch TW0.
The last mode is the easter egg inside the easter eggs:
DYkaos.
- Set Blinky to display the 'lone satellite'. Make sure you see it (SS6 is set). Now change the TW to 134 and DYkaos comes up.
- You can use the light pen to drag the pattern.
- See the source code (BLINKY-1c.lst, line 2677 and on) for more nifty tricks. It is a little algorithm with a big history: invented by Marvin Minsky, and documented in
ITEM 149 of MIT's AIM 239 "HAKMEM". All of
HAKMEM.HAKMEM is worth looking at, if you have not heard of it.
Code
Download the full code package through the orange button at the top left of the page, including the latest paper tape image file. You can have a quick view to the Blinky-1 code below. It comes in three parts:
-
1c - Blinky proper (start here)
Click to load...
-
1b - the help text printer
Click to load...
-
1a - the loader
Click to load...
There are more PDP-1 goodies in the download package - Mike's
radically upgraded version of the macro1 cross-assembler. It is fully compatible, but offers a lot more features (do not forget, there's also the AM1 macro-assembler from Bill Ezell and Angelo Papenhoff's. I thought that is useful to mention here).
Rimmer, to make efficient paper tapes. Also, Mike developed Blinky-1 before the PiDP-1 itself was finished, and thus developed his own version of the first
Javascript PDP-1 simulator from Barry Silverman, Brian Silverman, and Vadim Gerasimov, building on the
sgeo.github.io/jspdp1 version.
In the ZIP file, you will find a BLINKY-1_lem variant. Use this one, it disables Extend on the front panel (leaving the Extend switch set is a common user mistake on the PDP-1, this version prevents that from disrupting anything).
PDP-1 PUNCHY
This little demo types out any typewriter input on the paper tape punch. In that sense, it is a successor to the ribbon demo already in the PiDP-1 takes archive. But Punchy has some additional hacks built in. Download
here (link), and read the .lst file in the ZIP archive for details. Punchy's code is very straight and simple PDP-1 assembly, so a good place to start out from.
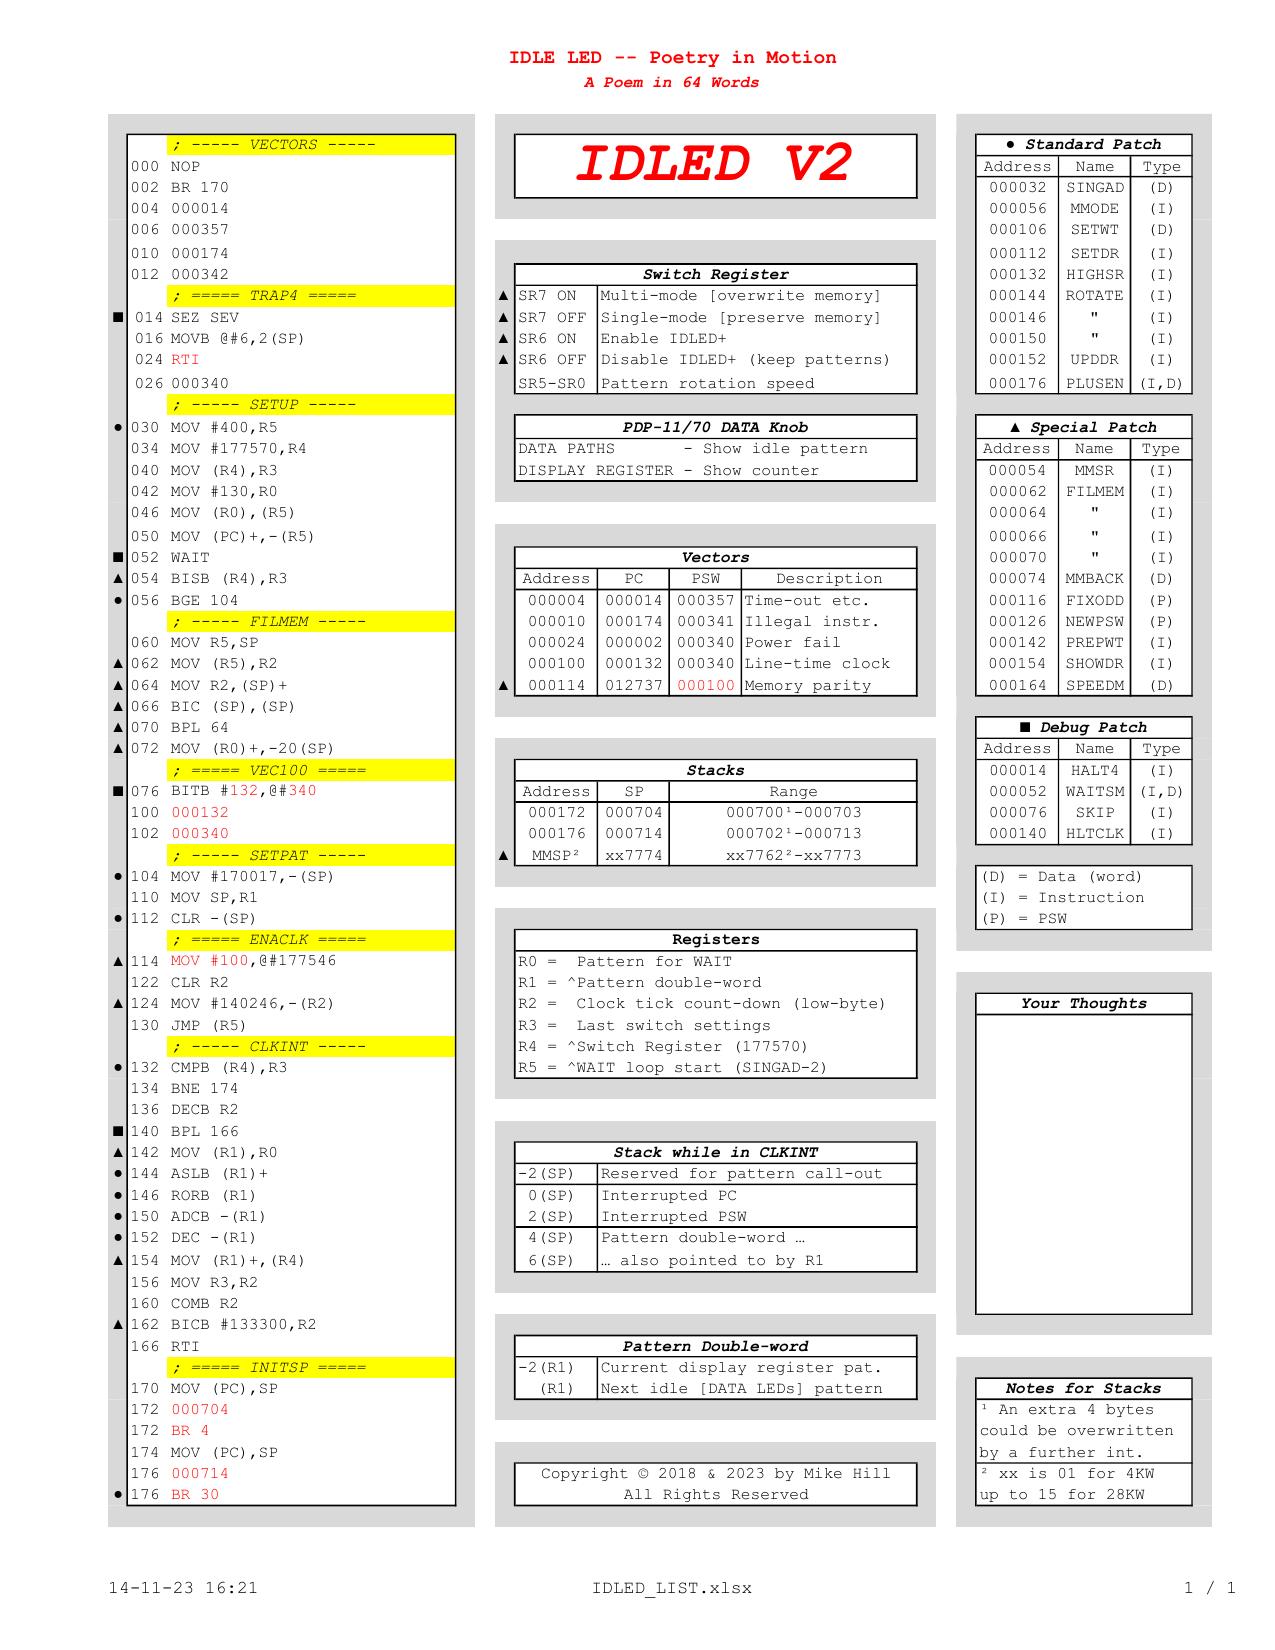
PDP-11 IDLED
On the PDP-11, we have IDLED. It, too, comes as a heavily commented simh boot script, and
pulls out all the PDP-11 programming tricks to make the front panel do interesting things. It was called
a poem in 64 words, trying to use as many non-standard coding techniques as possible. So where PDP-10 Blinky is straight-up programming, PDP-11 Blinky can best be seen as a puzzle - it is hard to figure out some of the tricks. Use simh's built-in debugger!
If you completely understand this 'poem', you may well call yourself an accomplished PDP-11 hacker.
Why 64 words? It was designed to fit in the boot block of any supported PDP-11 device, which means it needed to fit into 64 words. The first word has to be NOP for this purpose, so Mike was left with 63 of them.
IDLED is actually two parts. The original IDLED, which is a front panel Blinkenlights demo. IDLED+ is a plug-in for IDLED. It is enabled through setting SR6. Stored in locations 000176-000575, it adds switch selection (SR15-SR8) of the LED patterns including different ones for the Display Register. The
1-page cheat sheet with code & summary of features (click twice to zoom):
Code
Download the full code package through the orange button at the top left of the page. Or you can read the IDLED code below:
-
Commentary to solve the puzzles
Click to load...
-
Simh script with inline assembly - the way to run IDLED on the PiDP-11
Click to load...
-
When running IDLED, stop (Ctrl-E) to run this Simh script:
disassembles IDLED live on the PiDP-11
Click to load...
Mike also wrote an
improved version of rhialto's macro11 assembler, which is included in the download file.
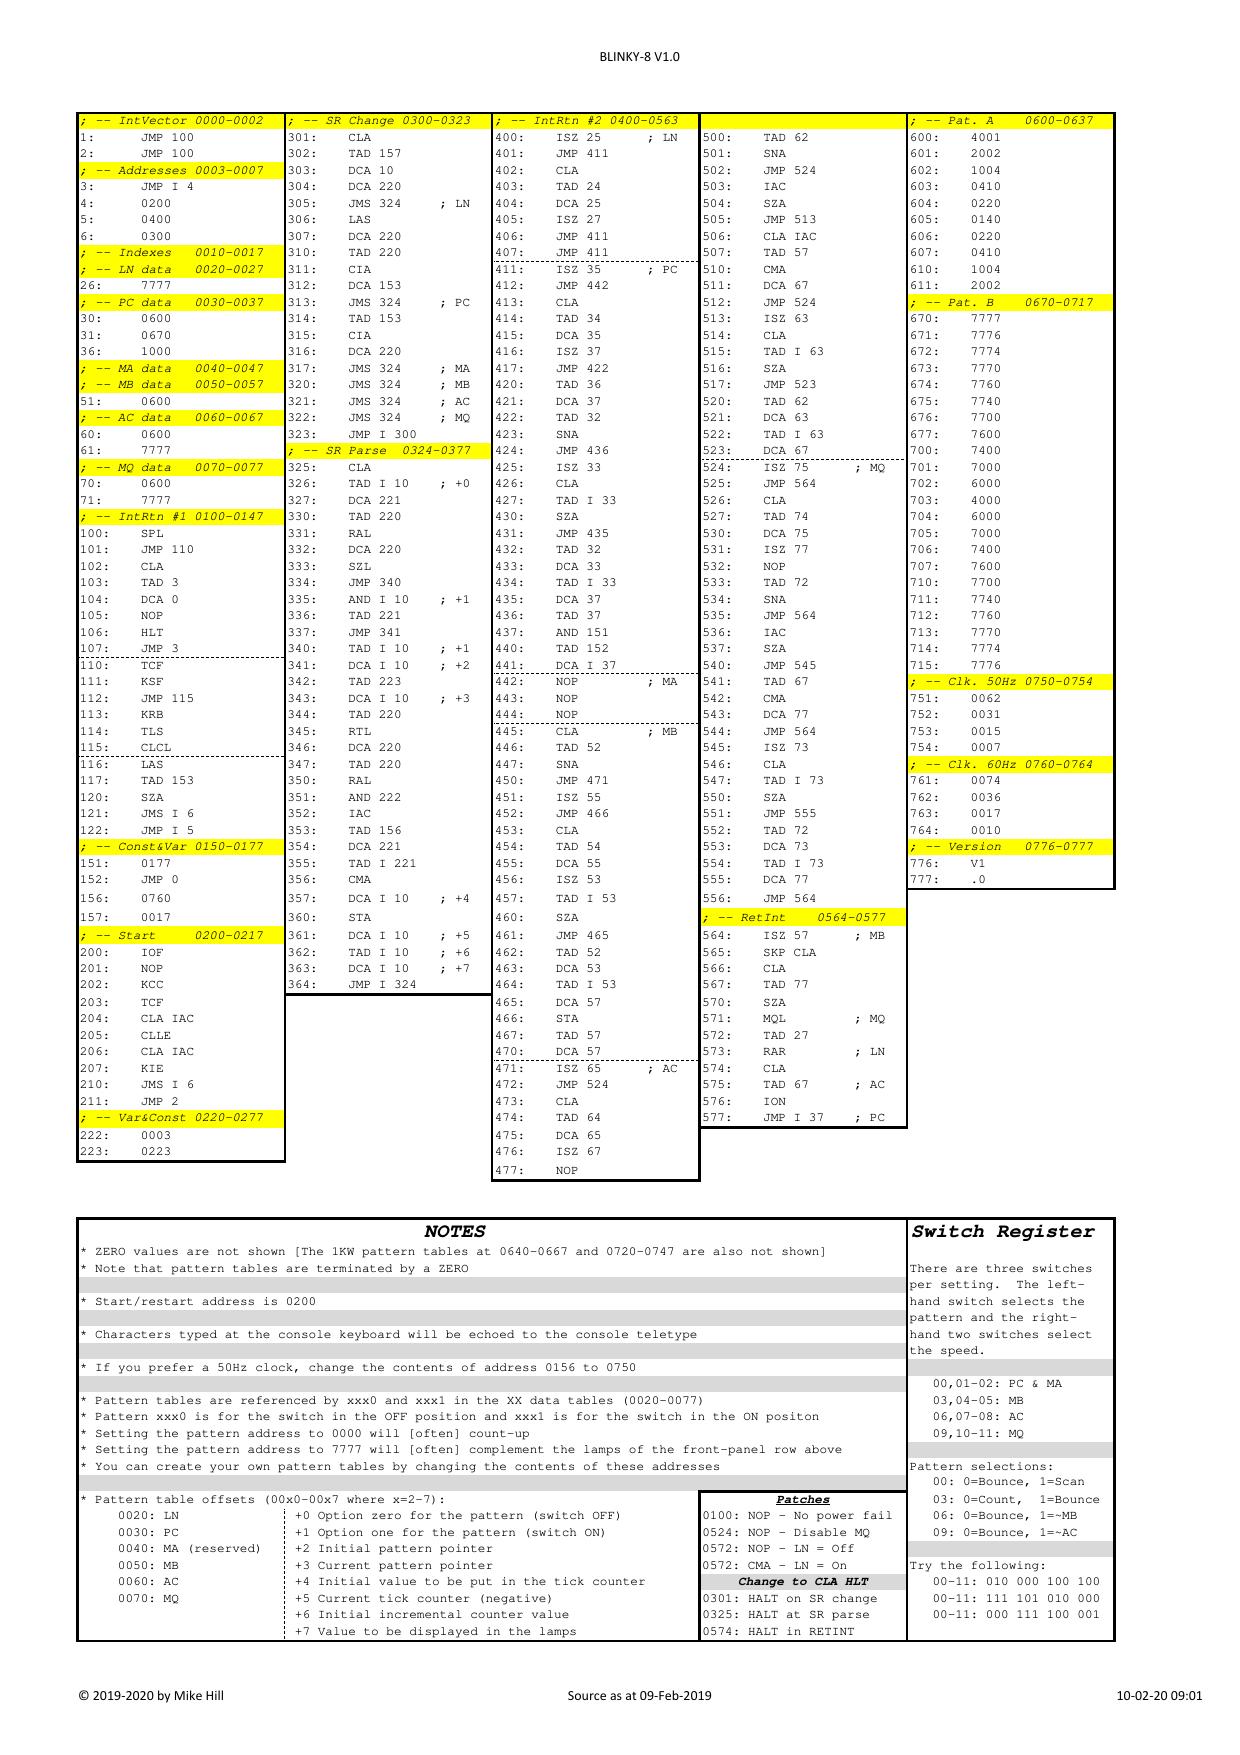
PDP-8 Blinky
PDP-8's Blinky shows off the PDP-8 front-panel by using the switch register to display varying patterns in the lamps. Like IDLED on the 11, it comes as a self-contained and self-documenting simh boot script.
Because it makes a point of using most of the PDP-8 instruction-set and programming methods (e.g. subroutines, interrupts, and auto-indexing), it is a very good first or second PDP-8 program to study. If you want to catch a flavour of what programming the Eight is like!
Operation through the SR switches: There are three switches per setting. The left-hand switch selects the pattern and the right-hand two switches select the speed. 00,01-02:
PC & MA patterns, 03,04-05:
MB pattern, 06,07-08:
AC pattern, 09,10-11:
MQ pattern. The 1-pager with code & summary of features (click twice to zoom):
Code
Download the full code package through the orange button at the top left of the page. Or you can read the code below:
-
Simh script with inline assembly - the way to run Blinky on the PiDP-8
Click to load...
You normally run a simh script by hitting Ctrl-E to go to the simh> command line, and type "do BLINKY8.txt" However, if you add LISTor DATA to the command, Blinky will list its code and data tables for you. Add EXEC to the end to make the script auto-start itself (so you do not have to type 'continue').
EZBlinky: 4 instructions to toggle in on the PDP-8 front panel (and amaze the audience)
A minimum BLINKY
for the PDP-5, PDP-8, and PDP-12 that you can just toggle in:
-------------------------------------------------
 ADDRESS  VALUE  INSTRUCTION
    7773: 2772 / ISZ I .-1 / x772
    7774: 5373 / JMP   .-1 / x773
    7775: 7026 / CML RTL
    7776: 4372 / JMS   .-4 / x772

Change 7775 (and/or 7772) for different AC effects.
-- Mike Hill, 7th March 2026.
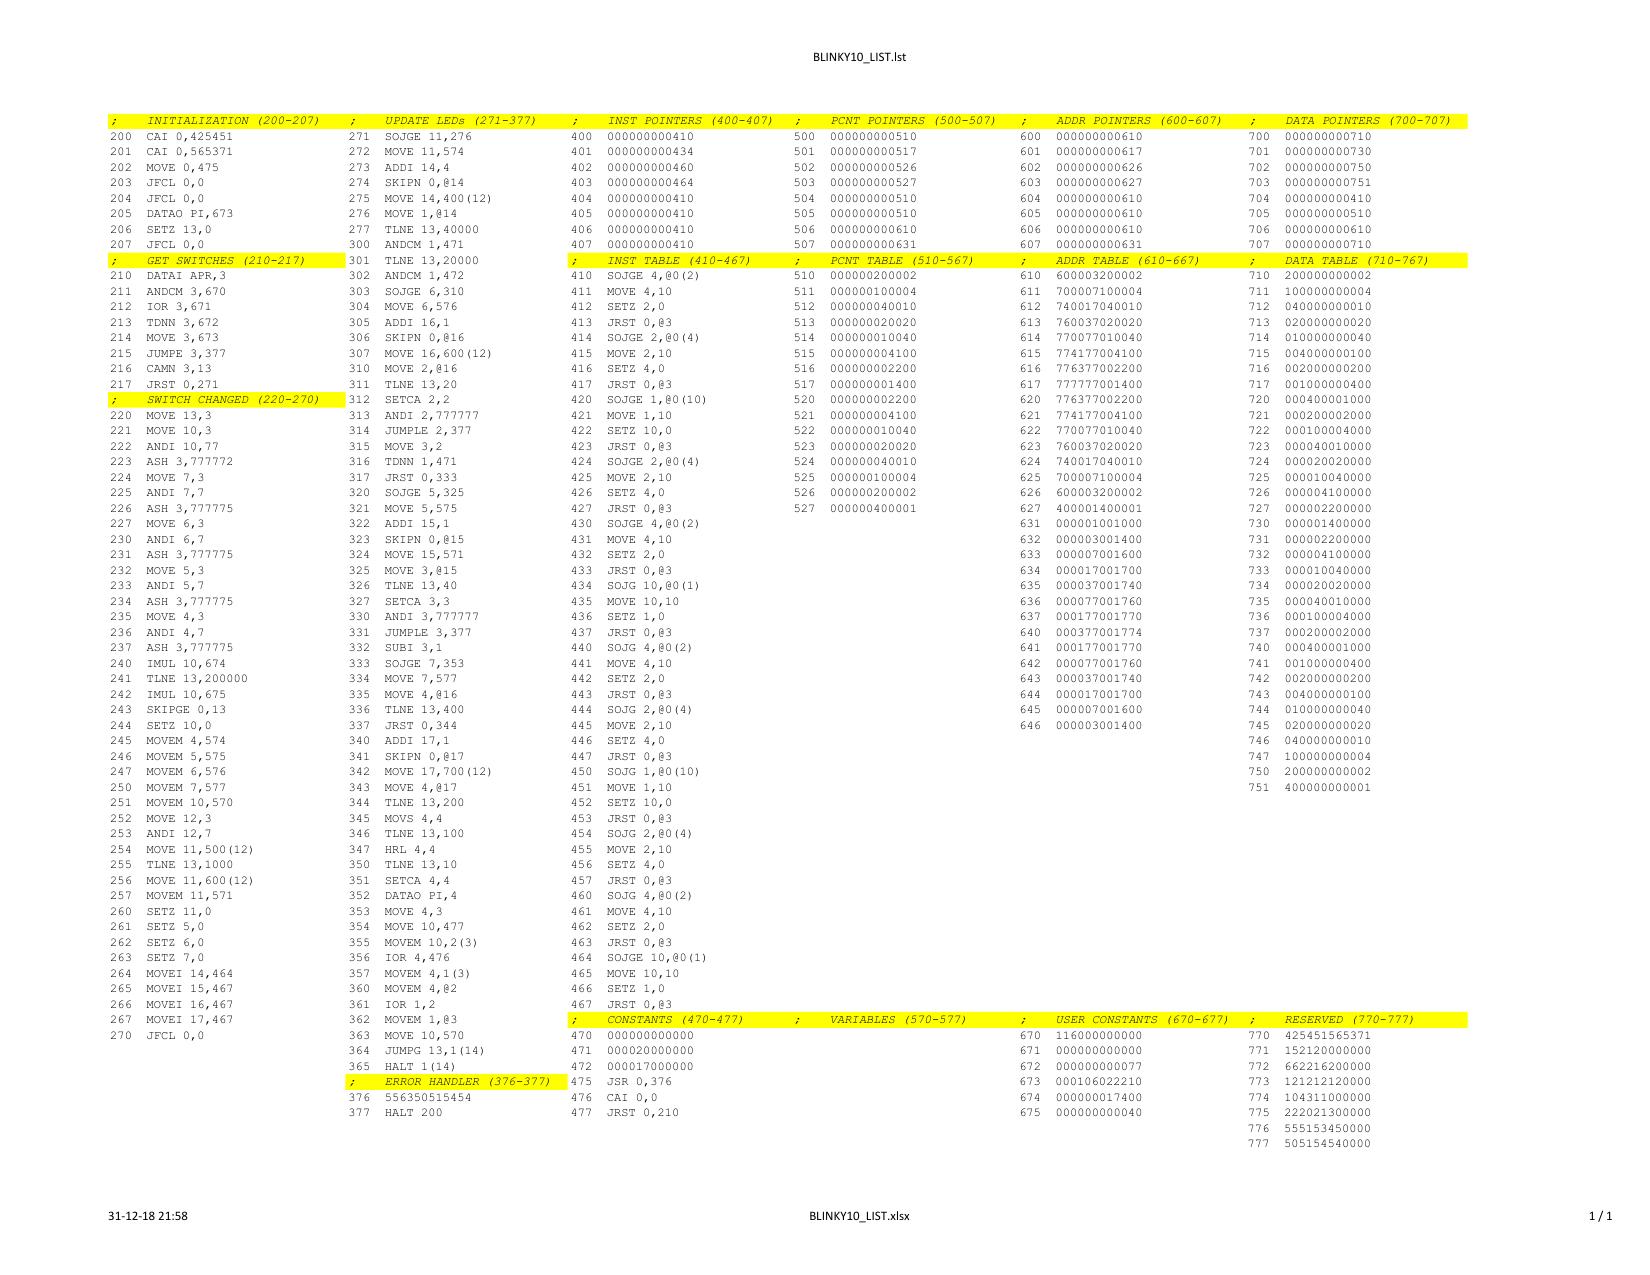
PDP-10 Blinky
PDP-10 Blinky is a much smaller, traditional, Blinkenlights demo. It is supplied as a stand-alone simh boot script. The code fits on a single page. It shows some neat tricks of how to animate register lights whilst they are in actual use, running code. The DATA switches are used to play with the demo. The cheat sheet:
BLINKY-10 - Blinkenlights demonstration for the PDP-10 V2.0 31-Dec-2018
=======================================================================

    DATA SWITCHES:-

	000 000|000 011|111 111|112 222|222 222|333 333
	012 345|678 901|234 567|890 123|456 789|012 345
	hf- ix-|--e|qsr|pad OOO|III PPP|AAA DDD|TTT TTT

	At least one T switch (30-35) must be ON to enable the actions below.

	Setting T to zero will load the default settings (see DSDEF below).

	Any enabled switch state-change will result in all lamp pattern cycles
	being reset to their initial states with the new settings.

    Action if DATA SWITCH is ON:-

	   00  (h)  HALT before starting the next TICK (to learn how it works)
	   01  (f)  Select FAST CPU mode (slows the TICKs by 32x)
	   02  (-)  Reserved

	   03  (i)  Turn off INDIRECT mode in the TICK loop instruction
	   04  (x)  Turn off INDEXED AC in the TICK loop instruction
	   05  (-)  Reserved

	   06  (-)  Reserved
	   07  (-)  Reserved
	   08  (e)  Set PCNT equal to ADDR (ignore the PCNT table)

	   09  (q)  Set DATA equal to ADDR (ignore the DATA table)
	   10  (s)  Swap the DATA RHS with LHS
	   11  (r)  Set the DATA RHS to the same as LHS

	   12  (p)  Complement PCNT lamps
	   13  (a)  Complement ADDR lamps
	   14  (d)  Complement DATA lamps

	15-17  (O)  Pattern offset (0-7) [7=1KW memory]
	18-20  (I)  INST speed relative to T
	21-23  (P)  PCNT speed relative to T
	24-26  (A)  ADDR speed relative to T
	27-29  (D)  DATA speed relative to T
	30-35  (T)  TICK speed (basic time unit ~1/63s)

	UBITS = 116000000000 (see DSOFF for when to use UBITS)

 Suggestion:-

       Start with all switches OFF then turn ON switch 35 followed by 34, 33,
       32, 31, and 30 until you find a comfortable pattern rotation speed.
       Then play with the other switches.
Code
Download the full code package through the orange button at the top left of the page. Or you can read the 10-Blinky code below:
-
Source code as a one-pager (click twice to zoom)
-
Assembled, with lots of commentary, as a simh/PiDP-10 boot script
Click to load...
Well, we did warn at the top of this page about there being a lot to Blinky. But hopefully, you've seen that studying Blinkies gives a flavour of programming on whichever PDP machine you are interested in. Blinky-1 is pretty much a book to read, IDLED on the 11 is a set of puzzles to bring you to hacker level; and Blinky-8 on the Eight gives a pretty complete overview of how things are done on that machine. Which for the Eight is very useful, the tiny instruction set makes that there is only one way to do things. But for more complex things, you have to see The One Way or you will spend a lot of time reinventing wheels.
Enjoy!