THE DEC PDP-1 MANUAL
2025 ONLINE EDITION
CONTENTS
Getting Started
Introduction
You don't need the PiDP-1 replica. The software runs and works just fine on any Linux machine, using a virtual front panel instead of the PiDP-1 hardware. And you're very welcome to join the PiDP-1 Google Group without the actual PiDP-1 hardware by the way - our goal is to revive the PDP-1, not necessarily to sell kits.
Thank you for keeping computer history alive!
Digital Equipment Corporation introduced their first Programmed Data Processor, the PDP-1, in 1959. Designed on the basis of MIT’s Project Whirlwind, TX-0 and TX-2 computers, the PDP-1 was designed in three and a half months through the genius of Ben Gurley. It was one of the first commercially available interactive computers – a revolution in a world familiar with batch-oriented, punch card-fed behemoths.
The purpose of the PiDP-1 project is to keep hands-on knowledge of the machine alive, and to help build a new user community to the first personable computer – one that sparked off computing as we know it today.
This manual starts with a section on setting up/operating the PiDP-1 replica. Then, we forget about the replica thing and focus on how to operate 'any' PDP-1. DEC’s own PDP-1 documentation is available online, including its excellent PDP-1 manual. DEC’s handbooks are better introductions than we could ever write. So this manual complements DEC’s own documentation with a focus on getting you started quickly, from a 21st century perspective. Because for everything that follows after that, DEC documentation applies without restrictions :-)
About the PiDP-1
We made our replica in two versions. Partly because DEC itself had a hard time making up its mind about how the PDP-1 should look, partly because we just liked both versions.
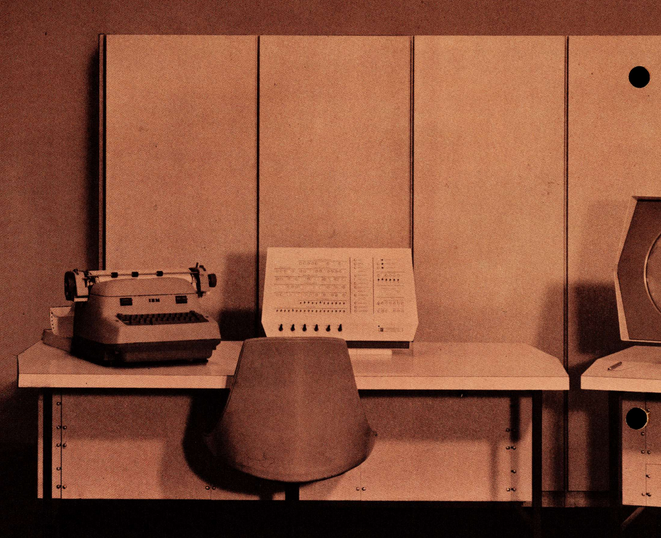
So, here is the historical father of the PiDP-1 'Console version':
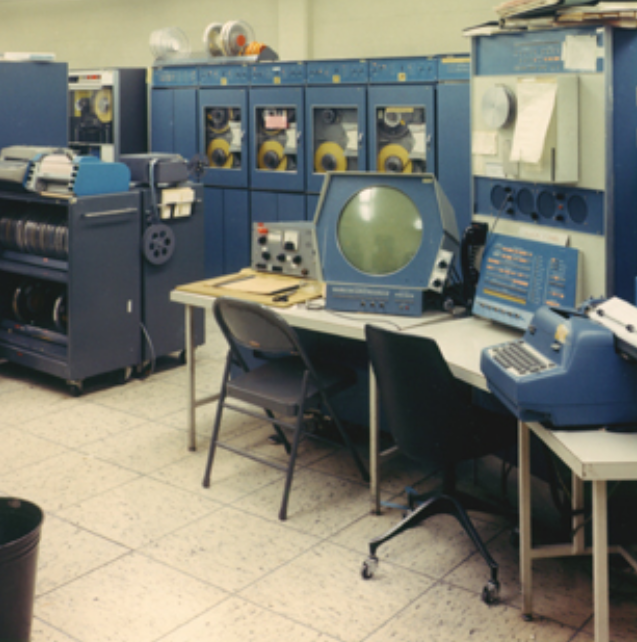
And here is the Lawrence Livermore, father of our PiDP-1 'Rack version':
Credit where credit is due
We should say that Norbert Landsteiner's PDP-1 forensics over the years has been crucial to everyone with an interest in the PDP-1. His web site is a treasure trove and should be the first thing to explore. We, too, learned a lot from there. The PiDP-1 would be no fun without all that work to lean on.
The PDP-1 restoration team at the Computer History Museum gave us a lot of support and encouragement. A lot of patience, too - thank you Lyle Bickley, Bob Rosenbloom and Abilio Marques.
Software for the PDP-1 has been preserved to a surprising degree. We mourn the loss of TECO, of course, but so much else has been preserved. That is not because of luck, but because of Al Kossow's bitsavers.org.
1. Building the 2025 PiDP-1 replica
Please refer to the PiDP-1 Building Instructions & the extended PiDP-1 Rack Version Building Instructions.
2. Installing the PiDP-1 software
Please refer to section 2 of the PiDP-1 Building Instructions.But a bit more background will be useful. The PiDP-1 is designed to either use the $15 Raspberry Pi Zero 2W, or the more expensive Pi 5. This is a matter of preference, both work equally fine if you do not want your PiDP-1 to run as a 'normal Pi;, with a media server or whatever you use a Pi for. For concurrent use, you'd normally choose the extra horse power of the Pi 5.
- If you use the Pi 5, we recommend you start with the GUI install. See below.
You can always switch to the Web interface if you find you prefer that. - If you use a Pi Zero 2W, use a Pi OS set up to boot into the Linux command line, not the GUI desktop.
You'll use the Web interface of the PiDP-1 software.
3. Using the PiDP-1
Important to understand before you continue:
The PiDP-1 will be running the PDP-1 'core' simulator. Then, there are separate simulators for all the major peripherals:
- the Soroban typewriter, for keyboard input and typewriter console output
- the Type 30 Display
- the paper tape and paper punch devices
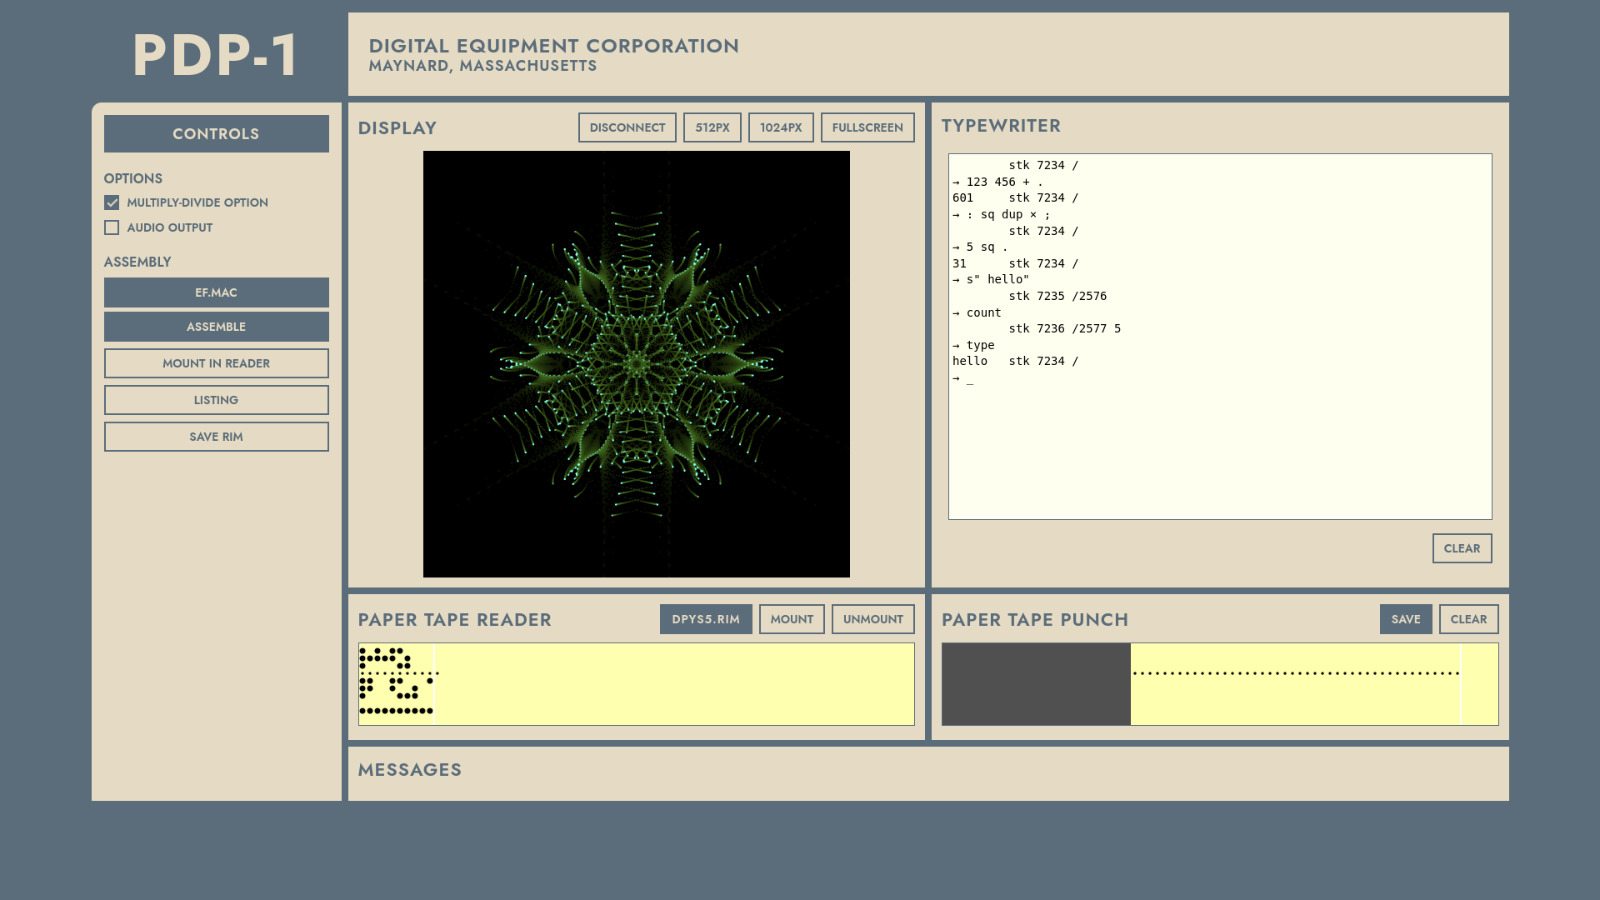
1. Stand-alone PiDP-1: GUI interface
Use this if you start on a Pi 5. It is not suitable for a Pi Zero. The screen shot shows the Peripherals program full screen.
Hit F11, and you'll see that you are on the regular Pi desktop. Note that you can shift/resize the peripherals on screen, and save that as a new default. Important if you use a 7 inch HMDI monitor in the PiDP-1 Rack!
to activate this mode:
pdp1control set gui
2. Headless PiDP-1:
Web interface
Use this for easy connection to your PiDP-1 from your laptop. It is very similar to the GUI interface, but now using your laptop over wifi instead of the Pi's monitor/keyboard.
If your PiDP-1 has the name pdp1, then point the browser to
http://pdp1.local:8080
to activate this mode:
pdp1control set web
3. Custom setups:
Peripheral Apps
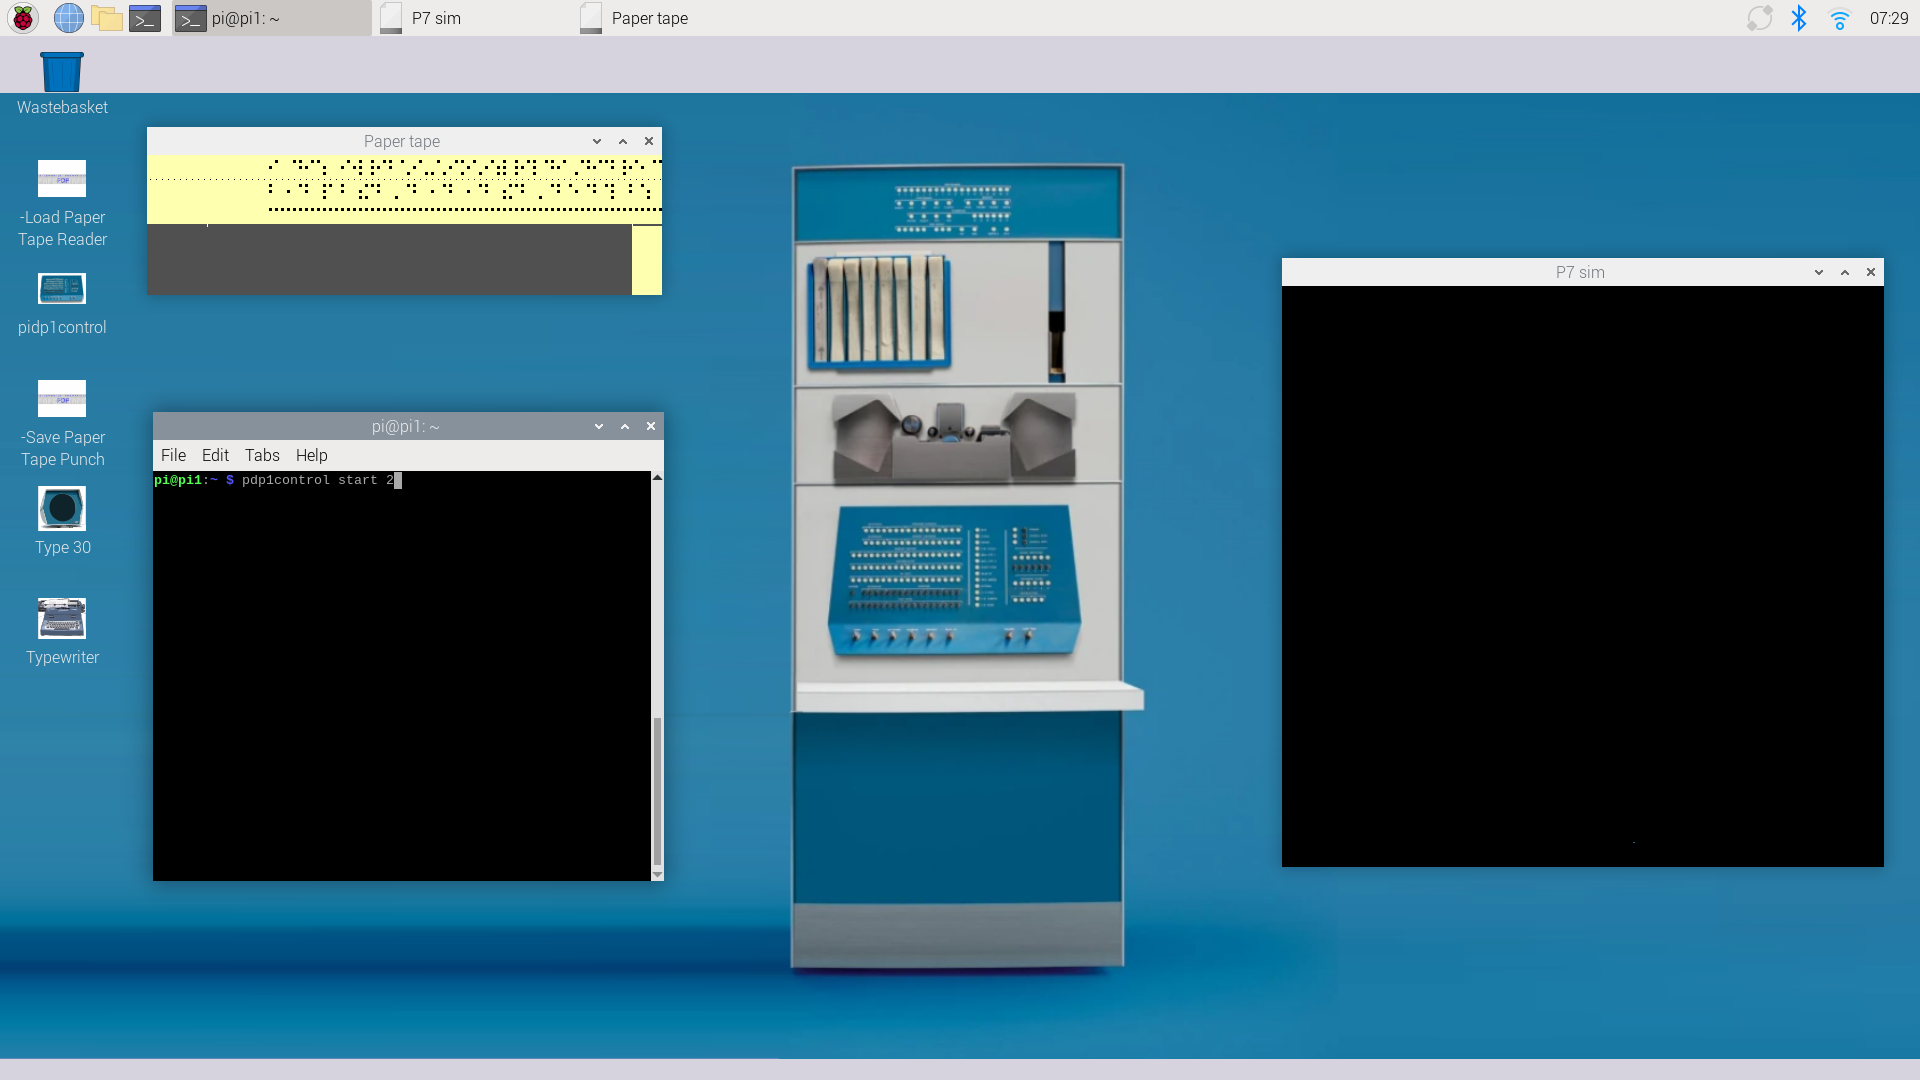
Use this if, for instance, you want the Type 30 display to run full-screen on the Pi's monitor, and the Typewriter terminal plus paper tape visualiser on your laptop. Or the other way around. Mix and match for the ideal demo setup. These 'peripheral apps' can run on the Pi. Or Linux, and Windows WSL2, connecting to the PDP-1 over wifi.
to activate this mode:
pdp1control set apps
(will run apps on the Pi, you can compile them to run as remotes on your laptop)
The choice of user interface is largely a matter of preference. But if you use a Pi Zero 2W, which is not terribly powerful, you should not boot it into the desktop GUI. Boot it into the Linux command line instead. You can use the PiDP-1 headless and then, the Pi Zero 2W is a very nice brain for the PiDP-1! OR run the Peripheral Apps on your laptop.
Setting up your PiDP-1 starts with the install script,
/opt/pidp1/install/install.sh. You need to run it at setup, but you can rerun it at any time to change things or update the software.
In daily use, you will use two other commands. They have desktop icon equivalents, but we'll describe the command-line commands here:
pdp1control commands
pdp1control is used to control the (simulated) PDP-1.
pdp1control start: start the PDP-1pdp1control start xcan be used if you are without the PiDP-1 hardware. x is the boot number you want to run.pdp1control stop,statusorstatdo what you'd expect.
pdp1control set gui,set weborset apps- switch between the gui setup (HMDI/keyboard on the Pi),the web server (http://pidp1.local:8080/) or the separate apps that can run on the Pi or elsewhere.pdp1control panel pidporvirtual- switch between the PiDP-1 hardware front panel or a virtual on-screen front panel.pdp1control usbtape yornen/disable the feature of using USB sticks as paper tapes.
pdp1 commands
pdp1 is a simple way to access/use the PDP-1 peripherals. Only necessary with the Apps interface, really.
pdp1 sorobanopens the Soroban used as the terminalpdp1 ptpsaves tape coming out of the paper tape punchpdp1 ptrloads an existing tape into the paper tape readerpdp1 type30opens the Type 30 display. Resize, or F11 toggles full-screen. Close any other display simulator first.pdp1 type30bopens a second Type 30 display - for dual-screen spacewarpdp1 simdrops you into the PDP-1 simulator program, which you'll not normally need to do
Using USB sticks as paper tapes
If you enable the use of USB ports as paper tapes: One USB connector is used as the reader, a second one as the punch. To mount a paper tape image in the reader: insert the USB stick. The most recent paper tape image with extension .pt is automatically mounted. Pull out to replace with a new tape. To save output from the paper tape punch, just insert a USB stick in the USB connector defined as the punch. This 'tears off the punched tape' and saves it on the USB stick with a time stamp as its filename. The punch is cleared.
The USB ports defined as punch and reader are set up in /opt/pidp1/bin/usb_paper_tape_ports. The default configuration is for a Raspberry Pi, the bottom black USB connector is punch; the top one is reader. If the USB ports are not assigned to your liking, do
pdp1control stop and /opt/pidp1/bin/pdp1_usb_monitor -scan. It will let you reassign the USB ports that are used.
If this mode is enabled, you can still mount paper tapes from the SD card, that does not interfere.
Customising the GUI Peripheral layout
The GUI peripheral display is a distraction-free, minimalist view of the PDP-1 peripherals. Although you can use it as just a window on the Pi's desktop, it makes more sense to run it full screen. Toggle full-screen mode with
F11.
PiDP-1 Rack users can add a 7 inch HDMI display behind the middle two speaker slots. And that is why the layout of the GUI peripheral display can be adjusted and saved, so that the Type 30, Typewriter and/or Paper Tape displays fit exactly behind the two speaker slots:
- Press
F2to toggle in/out of layout mode. Here you can rearrange the size/position of elements (paper tapes, typewriter, Type 30).left mouse buttonmoves,right buttonresizes.
Cycling withtaband usingarrow keysalso works;
Usectrlto resize andshiftfor more precise movement.
UseSpacebarto toggle visibility of elements - Create a new layout with
F3and cycle through layouts withF1 - Save the current configuration with
F6and re-read it withF5 - The background can be set by editing the configuration, `pdp1_layout.txt` in the current directory.
Experiment with custom layouts. By saving a few of them, you can cycle between different small and full-screen layouts quite easily, to suit whatever the PDP-1 project at hand requires.
Overview of GUI interface features:
| Key    | Action                     |     | Key    | Action                     |
| ------ | -------------------------- |     | ------ | -------------------------- |
| F7     | mount file in reader       |     | Ctrl-F1| Toggle Audio on/off        |
| F8     | remount last file          |     | Ctrl-F2| Toggle mul/div on/off      |
| F9     | saved punched tape to file |     | ------ | -------------------------- |
| F10    | clear punch                |
| Ctl-+  | increase font size         |
| Ctl--  | decrease font size         |
| ------ | -------------------------- |
| F1     | cycle layouts              |
| F2     | toggle layout mode         |
| F3     | duplicate current layout   |
| F5     | re-read pdp1_layout.txt    |
| F6     | save pdp1_layout.txt       |
 Default, full screen...
But to give some ideas for custom layouts:
 ...Saved format: compact window to fit next to the virtual panel
 ...Saved format #2, full screen to fit behind virtual PDP-1 panel + telnet console
Updating the PiDP-1 software:
cd /opt/pidp1git pull/opt/pidp1/install/install.sh, in most cases, it will suffice to say 'y' to- set owner
- update git submodules
- make required binaries ...or just say 'y' to everything in case of doubt!
4. Using the Sense Switches for quick boot options
Only for PiDP-1 hardware. If you run without, no problem - just load any of the software by mounting tapes from /opt/pidp1/tapes
Set the sense switches before start-up, and the PiDP-1 will boot into a particular configuration and also automatically insert the desired paper tape into the paper tape reader. Then, just press the READ IN switch to start loading and running the mounted paper tape. The sense switches will also work when you do a
pdp1control start. But of course, this feature requires the hardware PiDP panel. With the virtual panel, you need to do pdp1control start [octal number] to achieve the same result.
Remember, though, you do not need to boot the P(i)DP-1 into mounting software. Just mount any paper tape when the PDP-1 is already running and press READ IN, no need to restart the whole PDP-1!
Games
| Octal number | binary switch pattern | description |
|---|---|---|
| 01 | 000 001 | Blinky - a front panel hack |
| 02 | 000 010 | Spacewar! v4.8 |
| 03 | 000 011 | Pong |
| 04 | 000 100 | Ironic Space Simulator |
| 05 | 000 101 | 1invader |
| 06 | 000 110 | Spacewar! v2B.5 |
| 07 | 000 111 | Dual-screen Spacewar! v4.4 |
Graphics demos
| Octal number | binary switch pattern | description |
|---|---|---|
| 10 | 001 000 | dpys5-demo |
| 20 | 010 000 | minskytron |
| 30 | 011 000 | snowflake |
| 40 | 100 000 | munching squares |
| 50 | 101 000 | mapes hack |
| 60 | 110 000 | circle |
| 70 | 111 000 | ribbon |
Software
| Octal number | binary switch pattern | description |
|---|---|---|
| 41 | 100 001 | Expensive Typewriter |
| 42 | 100 010 | MACRO |
| 43 | 100 011 | DDT |
| 44 | 100 100 | Lisp |
| 45 | 100 101 | FORTRAN |
| 46 | 100 110 | --- |
| 47 | 100 111 | --- |
Italics: work in progress. More software is being added. But see the section 'Web resources' for a huge amount of PDP-1 paper tapes that is available on bitsavers.org and masswerk.at
File exchange between PDP-1 and modern computers
decode_fiodec tape.pt text.txt
converts paper tape to plain text file
encode_fiodec text.txt tape.pt
converts plain text file to paper tape
tape_visualizer tape.pt
inspect a paper tape image file

Appendix: Understanding the PiDP-1 hard/software setup
This appendix goes into the inner workings of the PiDP-1 hard/software. That may be of use when you want to customise your setup. The software is written as separate modules that interconnect over network ports. So it is quite easy to customise or improve one of these modules.
Of course, it is always a good idea to have a general understanding of the software setup - which is the first section below.
Software - overview
Everything about the PiDP-1 lives in the /opt/pidp1 directory. The sources are part of the package, the install script compiles the programs in the src/ directory.
All the executables are in the bin/ directory - note that most are symlinks to the actual compiled binaries in their src/ subdirectories. So if you recompile any source file, the PDP-1 simulator will immediately use the new version.
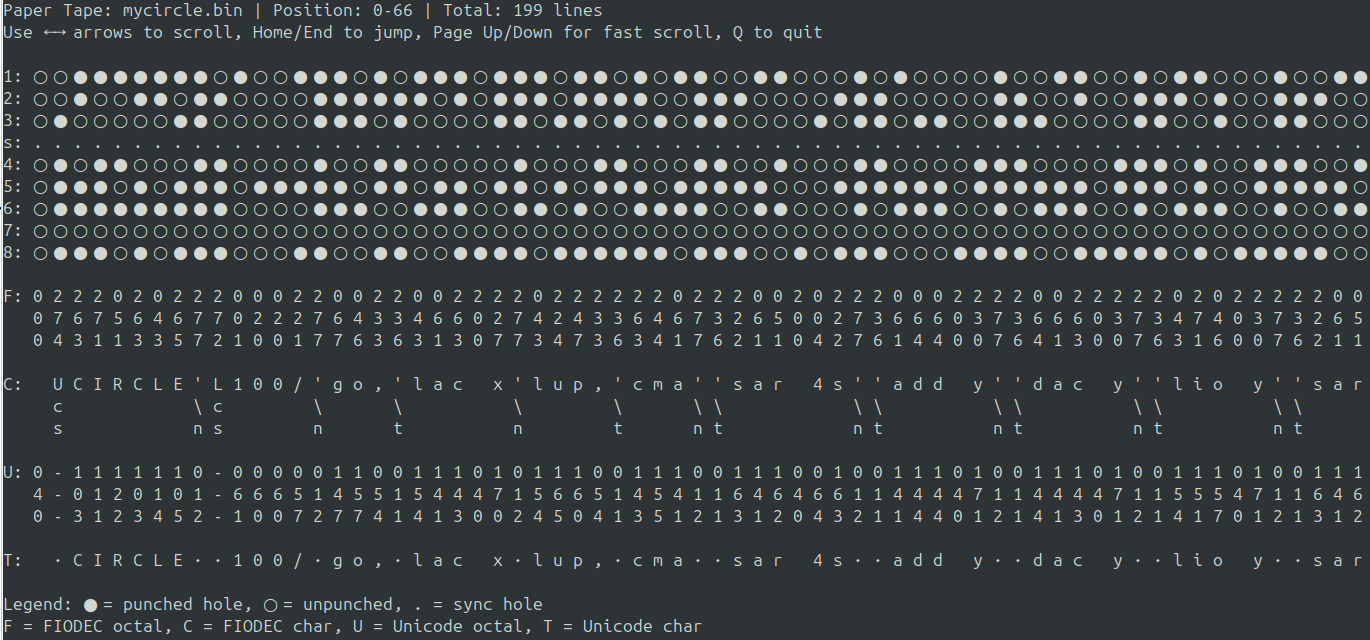
All PDP-1 paper tapes are stored in the tapes/ directory. They typically have .rim, .pt or .bin as their extension. The extension does not matter to the PiDP-1, it just tells you what kind of paper tape this is - .pt is likely to hold alphanumeric data, .bin might be a binary without RIM loader, .rim will have the RIM loader. But the extensions are not applied all that consistently (yet). Use tape_visualizer to inspect them.
In the sources subdirectory, the source code is stored for review. A doc subdirectory holds manuals.
Boot options: the Sense switches One way to boot up the PiDP-1 is to use the 6 sense switches on the front panel. The idea is, you set an octal number on the sense switches before starting the simulator. A little config file then auto-mounts the desired paper tape in the reader, and can set some hardware configuration settings for the PDP-1.
These config files are stored in the bootcfg/ directory. Their filename tells you what sense switch number they are linked to.
You can change, add or renumber the cfg files to your preference. There's not much special about them.
Software - panel driver, virtual & physical front panels
Please note that the whole PiDP-1 software package can run on regular Linux just as well as on a Raspberry Pi. You woud then use the virtual front panel instead of the PiDP-1 hardware. It will work on Windows as well, if you set up the WSL2 subsystem with graphics display. We're looking for a Windows user who can do a little write-up about that!
The main programs, all in /opt/pidp1/bin:
- pdp1: the actual simulator. It uses telnet connections 1040 for direct command entry (not used, but type ? for the menu) and 1041 for connecting to the simulated typewriter. TCP ports are used to connect to the other peripherals, so these may run locally on the Pi or remotely on your laptop.
- panel_pidp1: the hardware driver for the PiDP-1 front panel.
- vpanel_pdp1: the virtual front panel you can use instead of the PiDP1 hardware
- pdp1control.sh: the bash script that starts up the whole system, and can reconfigure it. Have a look inside, it's just a script.
Software - GUI interface
- pdp1_periph: the all-in one window that typically runs locally. You could use it from a remote machine as well, though.
Software - Web server interface
- /opt/pidp1/web_pidp1 contains the web server
- to connect to the web server, you would typically use a browser and URL http://[pi's host name].local:8080
Note that you could configure the Pi so it can be reached from anywhere, offering PDP-1 compute time as a valuable public service :-)
Software - Apps interface
- pdp1.sh: used to attach peripherals, mount tapes, etc during regular use. Have a look at the script, it will show you how it is done and how you could hack your own configuration.
- tapevis: visualises the paper tapes.
- p7sim/p7simES: the type 30 display
a Second Type 30 can be attached, by running the same program as p7simES -p 3401 localhost. The ES version has a lighter CPU load but almost the same image quality. It is preferred. - load/save_ptr.sh: little scripts that mount paper tapes. Again, just look inside for how it's done.
- pdp1.sh is used here as well as in GUI mode. Look inside for how to use the various programs.
Hardware - theory of operation
pdp1 is the actual simulator.
It uses telnet connections 1040 for direct command entry (not used, but type ? for the menu) and 1041 for connecting to the simulated typewriter. TCP ports are used to connect to the other peripherals, so any of these may run locally on the Pi or remotely on your laptop.
The simulator is an interesting one: it simulates the circuit of the PDP-1 on the lowest level, rather than just simulating CPU instructions. The original version was, in fact, FPGA code, now converted to a simulation in C. have a look at the source code in /opt/pidp1/src/blincolnlights/pdp1/pdp1.c
The PDP-1 used non-volatile core memory. So after a power-down, the memory would still be intact. You can inspect the saved core memory in the file /opt/pidp1/coremem. It is in human-readable format.
The core pdp1 simulator needs a front panel attached to it to do anything useful. Either the hardware PiDP-1 driver or the virtual panel. It's not hard to write your own front panel controller if you'd like to do something customised, like a front panel web page or something.
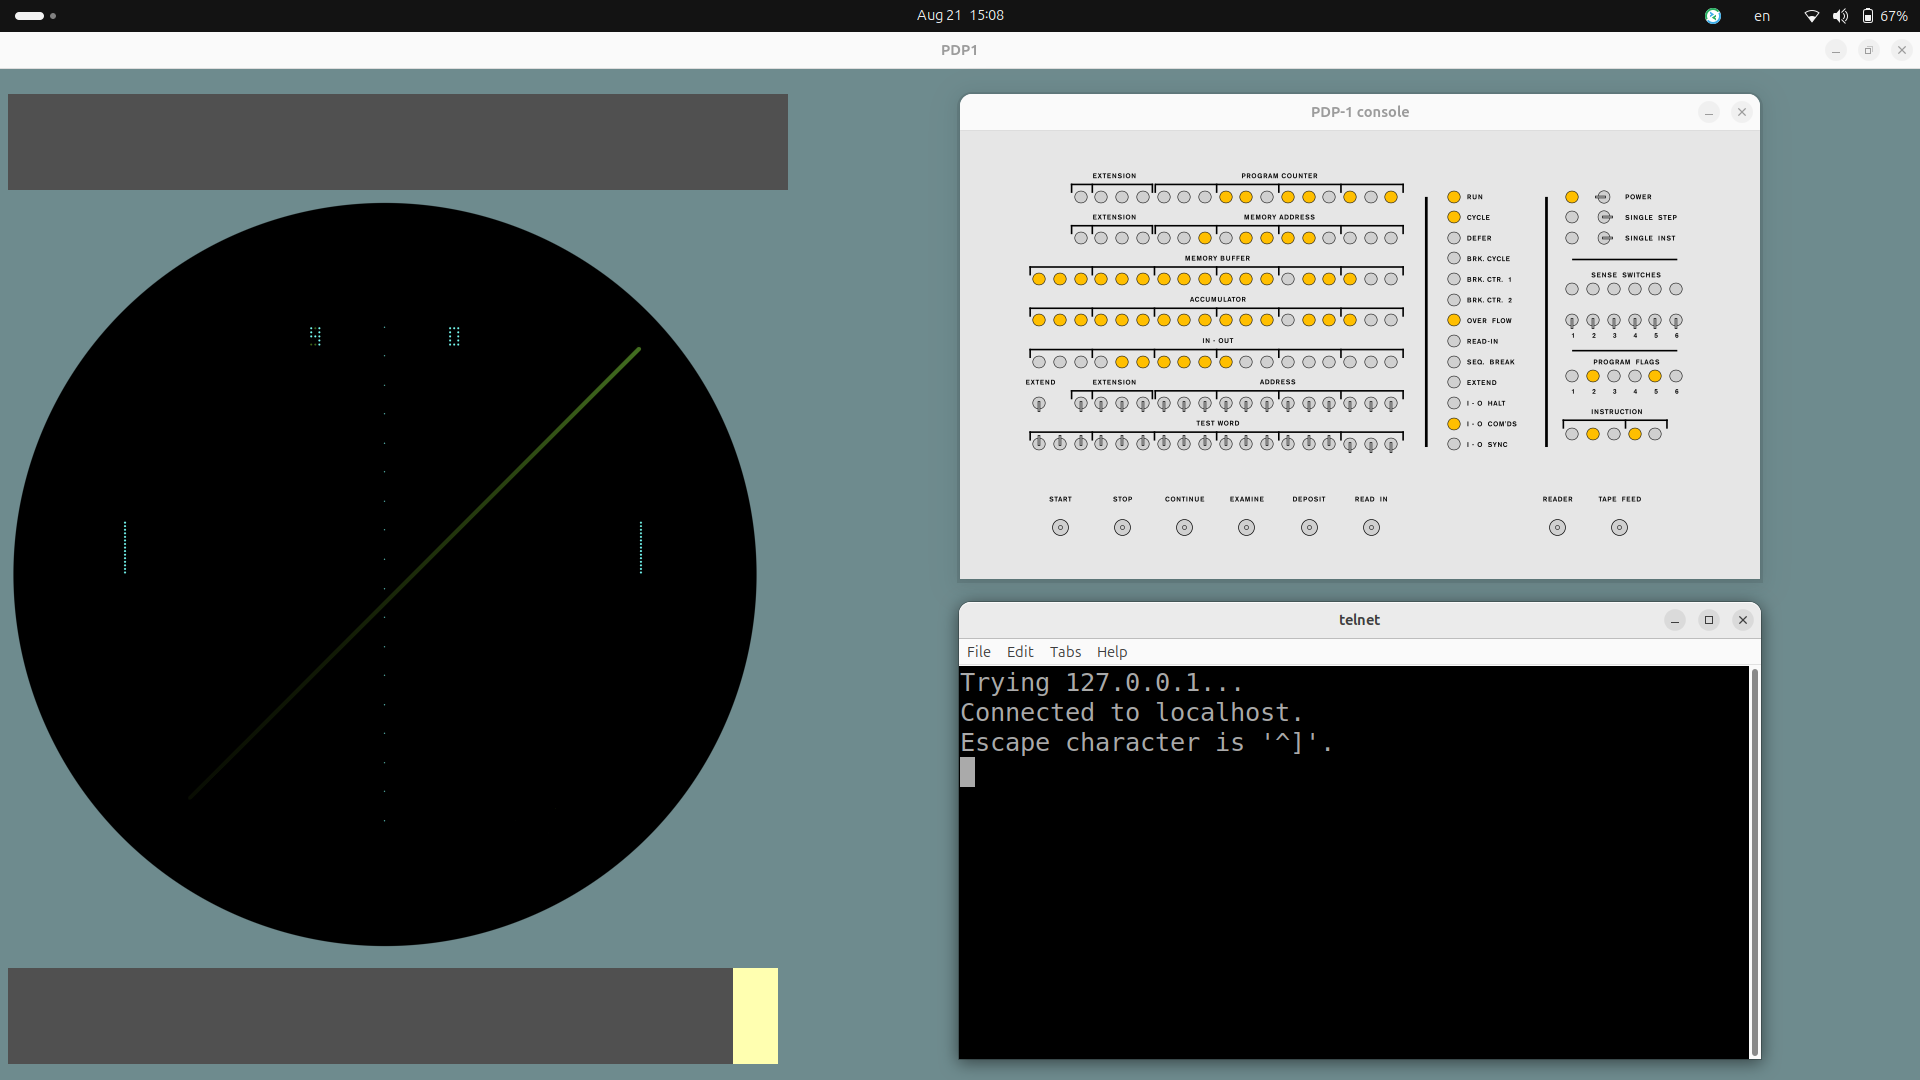
Using a PDP-1 - either a 1959 or a 2025 version
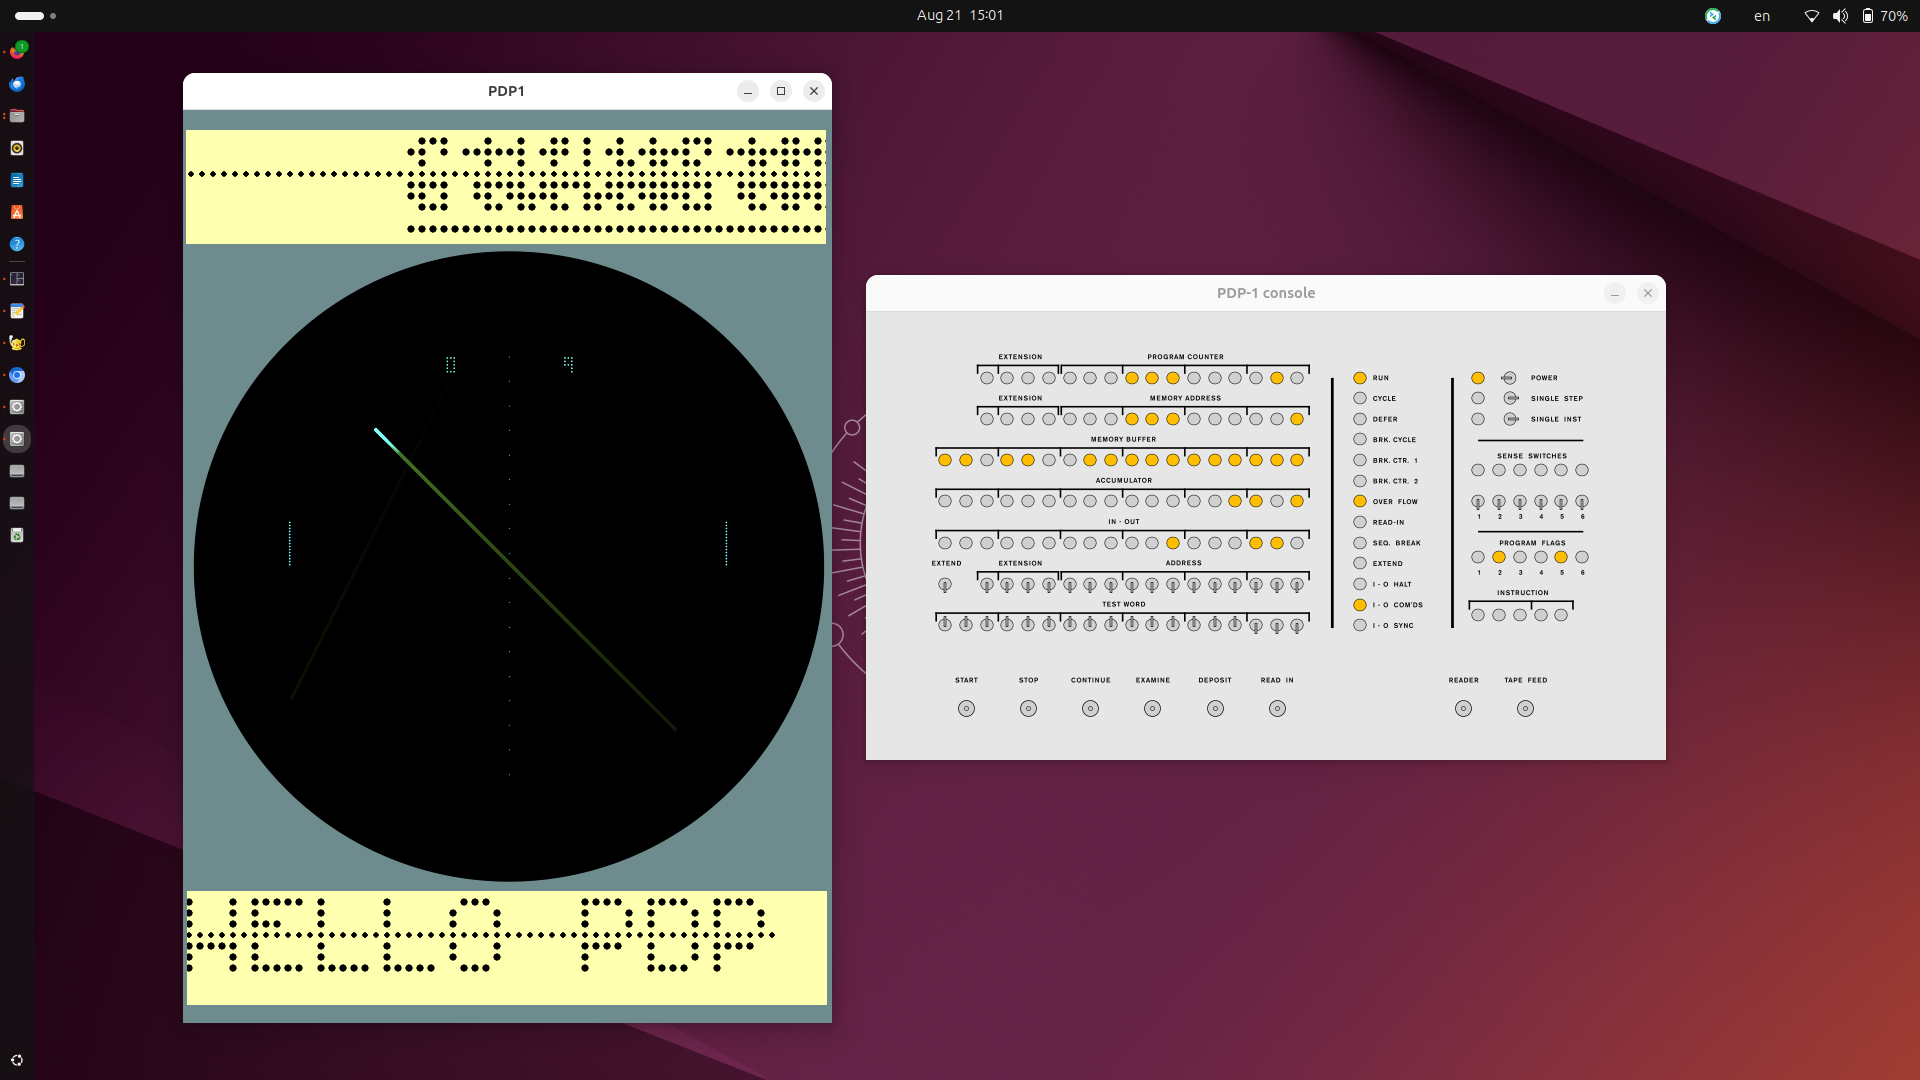
Introduction to the Front Panel
Once you know what you are looking at, the front panel is actually very simple. Read the original PDP-1 manual (link) for the details, but essentially:
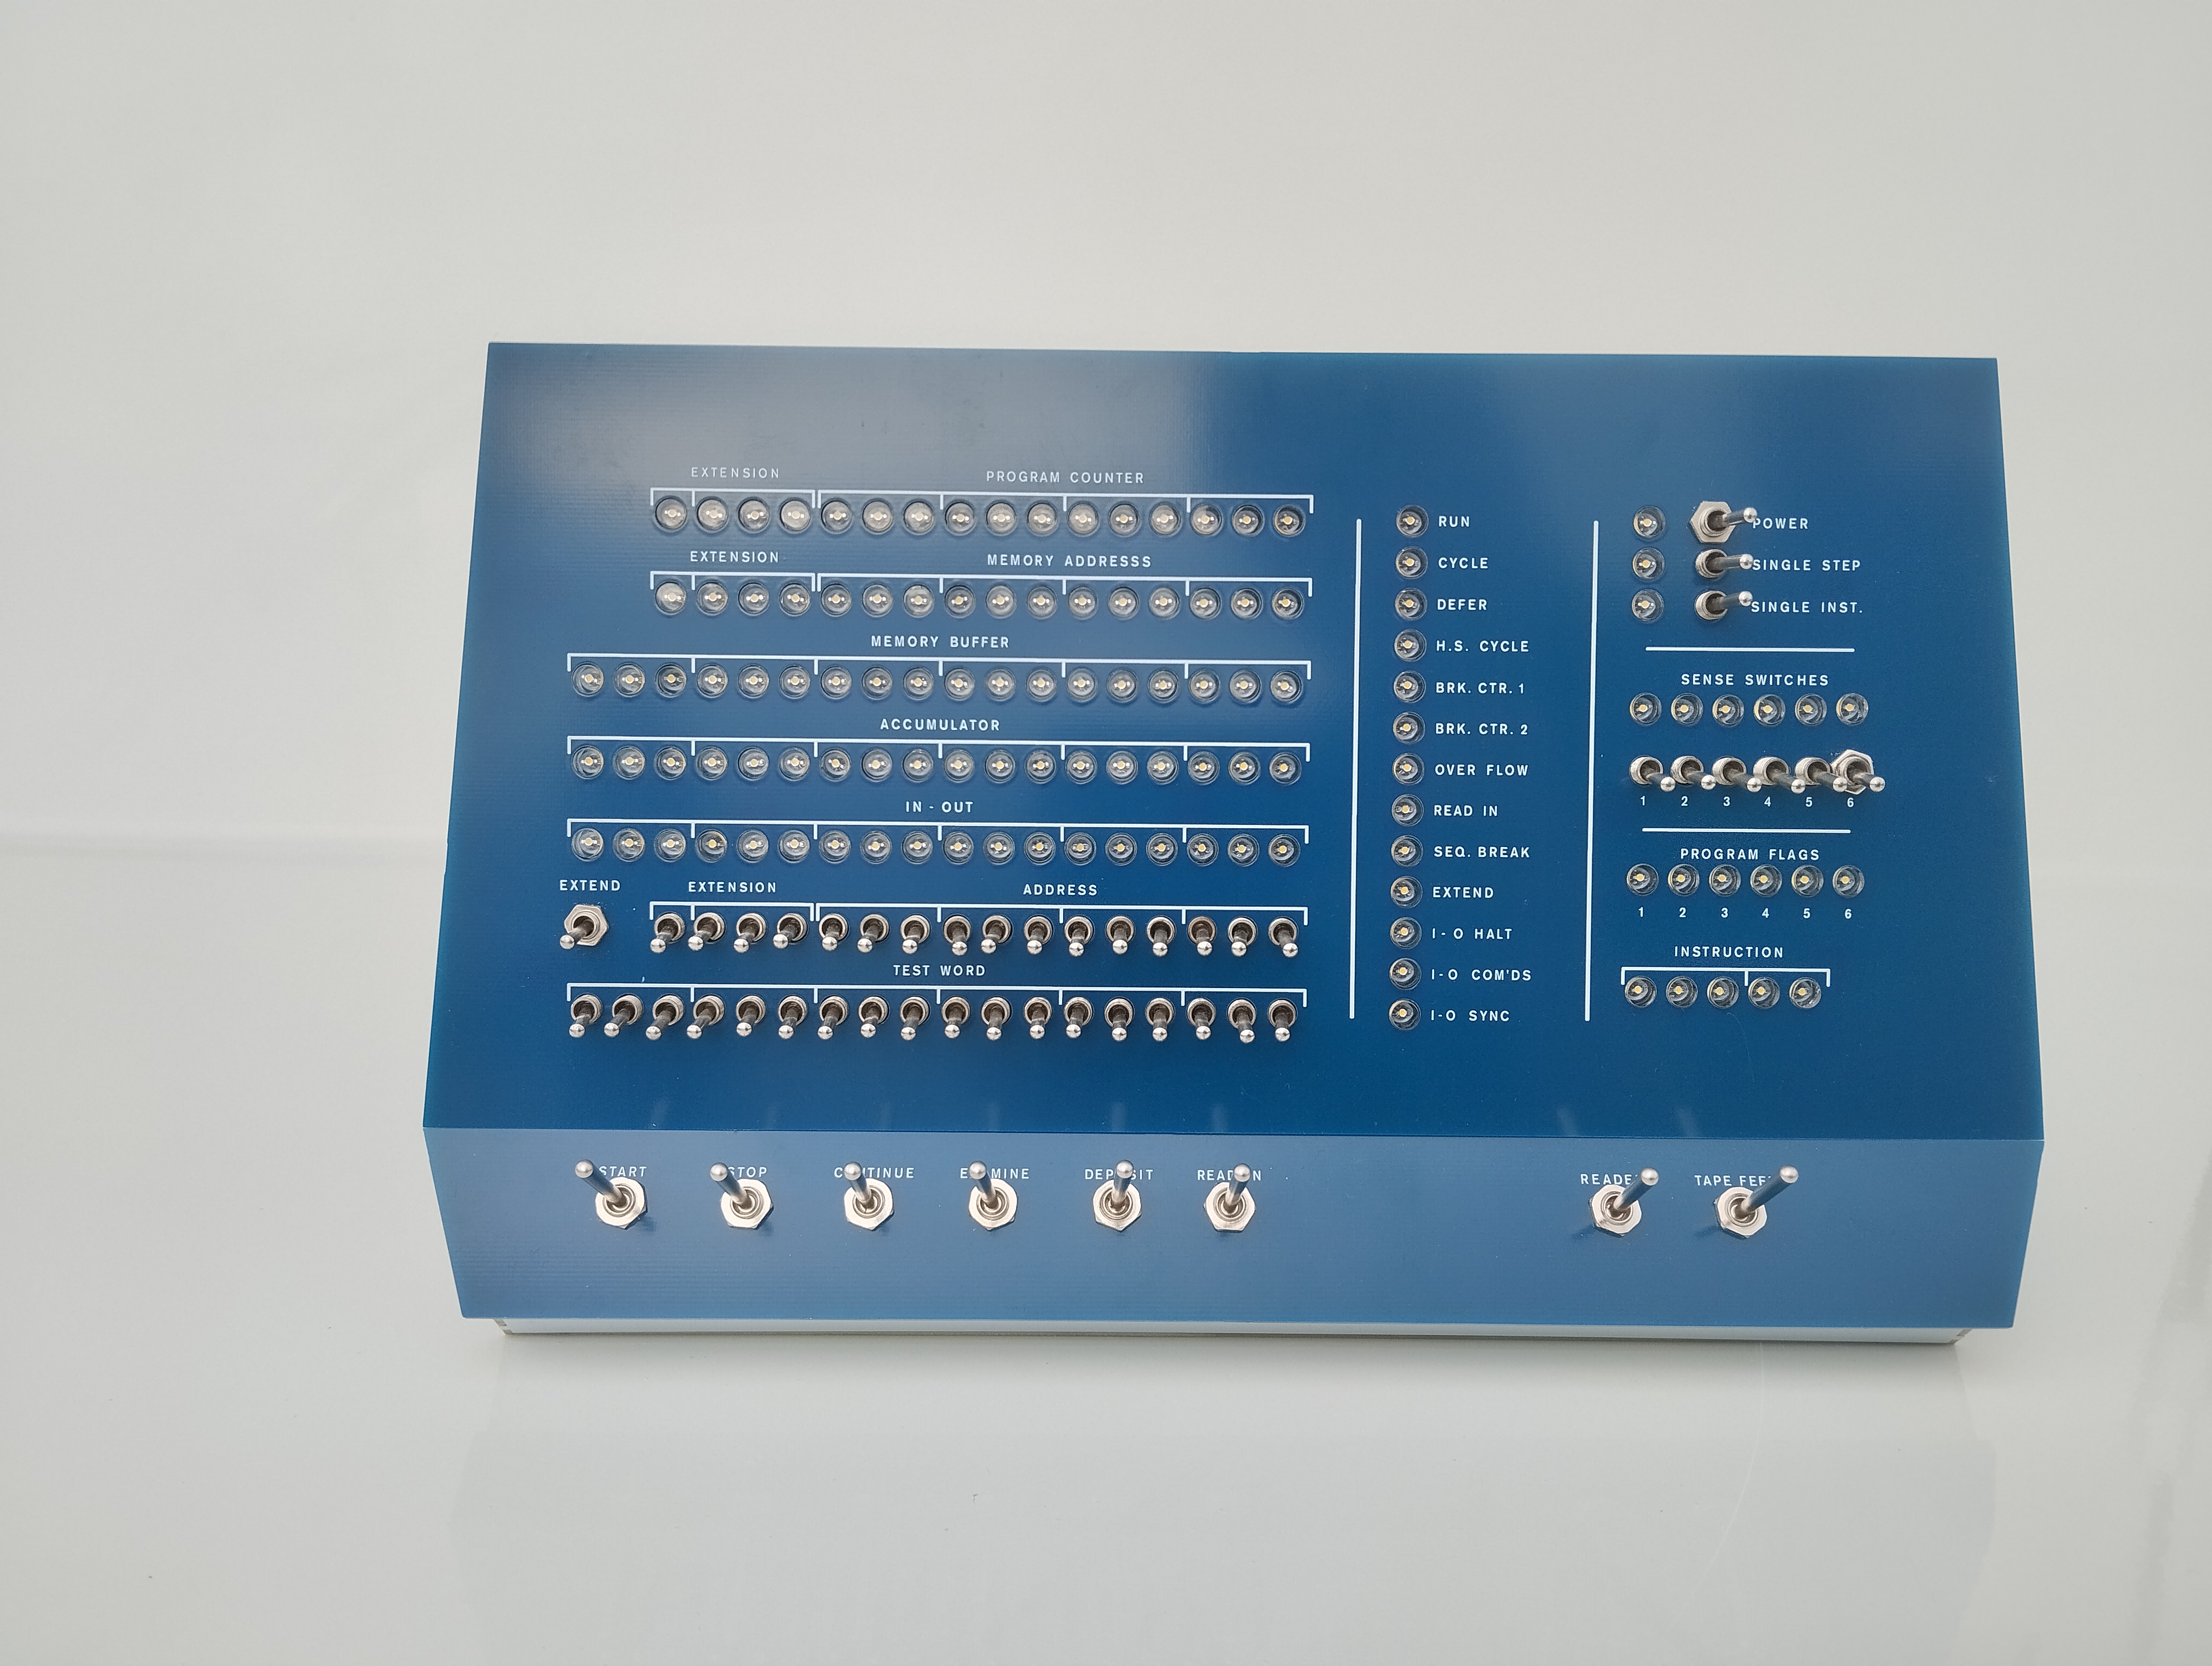
- The top row of LEDs just shows you where in memory the computer is executing: this is the Program Counter.
- The second line shows you the address in memory that is in the CPU's Memory Address. Read the original manual to see the difference between MA and PC.
- The third line shows you the data in the memory location that MA is pointing to. The fourth line shows the contents of the Accumulator; the fifth line that of the IO register.
- The first row of switches can be used to form an address. It can be used with the Examine and Deposit switches to inspect/edit memory locations, or with Start to run a program from that address. The Extend switch to its left sets the PDP-1 to extended memory mode, see the manual. Best to keep this switch down normally.
- The second row, Test Word, is an 18-bit word that can be deposited into memory. But running programs can also read these switches and use them as input.
-
These are the control switches: STOP halts execution. When stopped, CONTINUE just gets the computer running from its previous state again. START starts execution from the address on the Address switches. EXAMINE lets you read the value in the memory location set by the Address row of switches. DEPOSIT puts the data on the Test Word row of switches into that memory location.
READ IN starts the paper tape reader, and the PDP-1 hardware actually loads the data automatically. Read up on the RIM Loader to see how this all works, it is nifty.
READER just wakes up the paper tape reader's motor - you won't need this switch because the PiDP-1 is happy to keep its software motor spinning. But you can if you want. TAPE FEED just spits out empty lines on the paper tape punch. That is useful to separate different pieces of information rolling out of the punch.
- The POWER switch works - if you see no lights, look for this switch :-)
- SINGLE STEP: misleading at first sight. It steps not single instructions, but single phases within the instructions. You won't need it, but it works
- SINGLE INST: Enable this switch (push to the left) to set single stepping mode. Press STOP if the computer is not halted yet. Now with each press of CONTINUE, a single instruction is executed. Great for debugging.
- Sense Switches: These six switches can be read in by programs. Consider them as user input to running programs.
- Program Flags: Consider them as user output, programs can set these to inform the user of whatever they want.
- Instruction: This shows you the 5 bits that encode the number of the instruction currently being executed. Make sure you have the PDP-1 Refence Card at hand, it's simple then to know what the computer is doing when you press STOP.
We'll skip the vertical line of indicator lights in the middle of the panel. Read the original PDP-1 manual (link) for that. The crucial light is RUN: the computer is running when this is on, off when it is not.
Mounting & loading a paper tape
Reader:
On the real PDP-1, you would put the paper tape in the reader, and press READ IN.
- If you use the PiDP-1 with the GUI interface, the equivalent is the
F7to pick a tape,F8to remount it. Then, press READ IN. - The Web interface has a BROWSE button to pick the tape you want, and a MOUNT button to put that into the reader. Then, press READ IN.
- If you use the PiDP-1 with the Apps interface, the equivalent is the
pdp1 ptrcommand, or its icon on the desktop. Then, press READ IN. - If you have the USB Paper Tape function enabled, you can also just put a USB stick in the USB Reader connector. Then, press READ IN.
Punch:
Computer programs drive output on the punch. Although the user can spool some empty paper tape by pressing the TAPE FEED switch. On the real PDP-1, you would tear off the paper tape that the machine spits out when you want to 'save' that tape.
- The PiDP-1 GUI uses the
F9command to 'tear off the tape' and save it as a paper tape image file.F10just clears the punched data from the reader ('tear off and throw away') - The PiDP-1 Web interface has a SAVE button to do the same.
- The PiDP-1 Apps interface uses the
pdp1 ptpcommand to 'tear off the tape' and save it as a paper tape image file. - With the USB Paper Tape enabled, you can just stick in a USB stick. The output of the paper tape will be saved to the USB stick as [timestap].pt. If you later on decide to read this USB stick by plugging it into the reader: know that the reader will pick the most recent .pt file on the USB stick, and ignore the rest.
Games & Display Hacks (graphics demos)
Please click the button to go to the page dedicated to games and Display Hacks (graphics demos): GAMES & DISPLAY HACKS
Programming the PDP-1: Quick introduction
The programming cycle for a PDP-1 assembly programmer would consist of 3 or 4 steps.
- Enter and edit the source code using a text editor, punching a paper tape with the source code when done.
- Compile the source code tape using an assembler, punching a paper tape with the binary code when done.
- Loading the binary code to run it, and see if there are any bugs.
In the old days, the text editor was TECO. Alas, that program has been lost in the mist of time. But before you feel sad, another editor has been preserved: ET, for Expensive Typewriter. It might be good news, because ET is a lot easier to work with. The traditional assembler is MACRO. It has its roots on the PDP-1's predecessor, the TX-0, and was one of the first programs available for the PDP-1. There are other assemblers though. DDT is the traditional debugger. In fact, it was the first debugger ever, and remarkably pleasant to use.
In summary:
Please click the button to go to the page dedicated to programming the PDP-1:
PROGRAMMING THE DEC PDP-1, A QUICK START
ET ---> source paper tape ---> MACRO ---> binary paper tape ---> (optionally in DDT) ---> load binary tape to test your program.
C programming on the PDP-1: Quick introduction
Well, it is the 21st century. Filip Kokosiński targeted the GCC compiler to the PDP-1.
The quick instructions:
First, rename the PiDP-1 command 'pdp' (that is only really used in the Apps interface, you likely do not use it) to pdp1apps. It is in the way of the simh PDP-1 simulator that's part of Kokosiński's package:
sudo mv /usr/local/bin/pdp1 /usr/local/bin/pdp1apps
Then,
git clone https://github.com/fkokosinski/pdp1-playground.git
cd pdp1-playground
git submodule update --init --recursive
...but let it not distract you from PDP-1 assembly programming :-)
Lisp programming on the PDP-1: Quick introduction
Please click the button to go to the page dedicated to programming the PDP-1: LISP PROGRAMMING ON THE PDP-1
Music: Samson's Harmony compiler/player
Please click the button to go to the dedicated page: PDP-1 MUSIC
PDP-1 Learning by Doing - some interesting programs
Writing small programs on the PDP-1 is not hard. With only 27 instructions, the amount of things to know before you start is limited. Of course, writing complex programs with these constraints gets harder... that might be the fun. If your choice is assembly language (perhaps the main attraction), first read PROGRAMMING THE DEC PDP-1, A QUICK WAY TO GETTING STARTED to know the development tools on and off the PDP-1. That gets you up and running with the practical tools.
Then, this overview of the instruction set is a useful reference card to have next to the PiDP-1 (click to zoom/print):
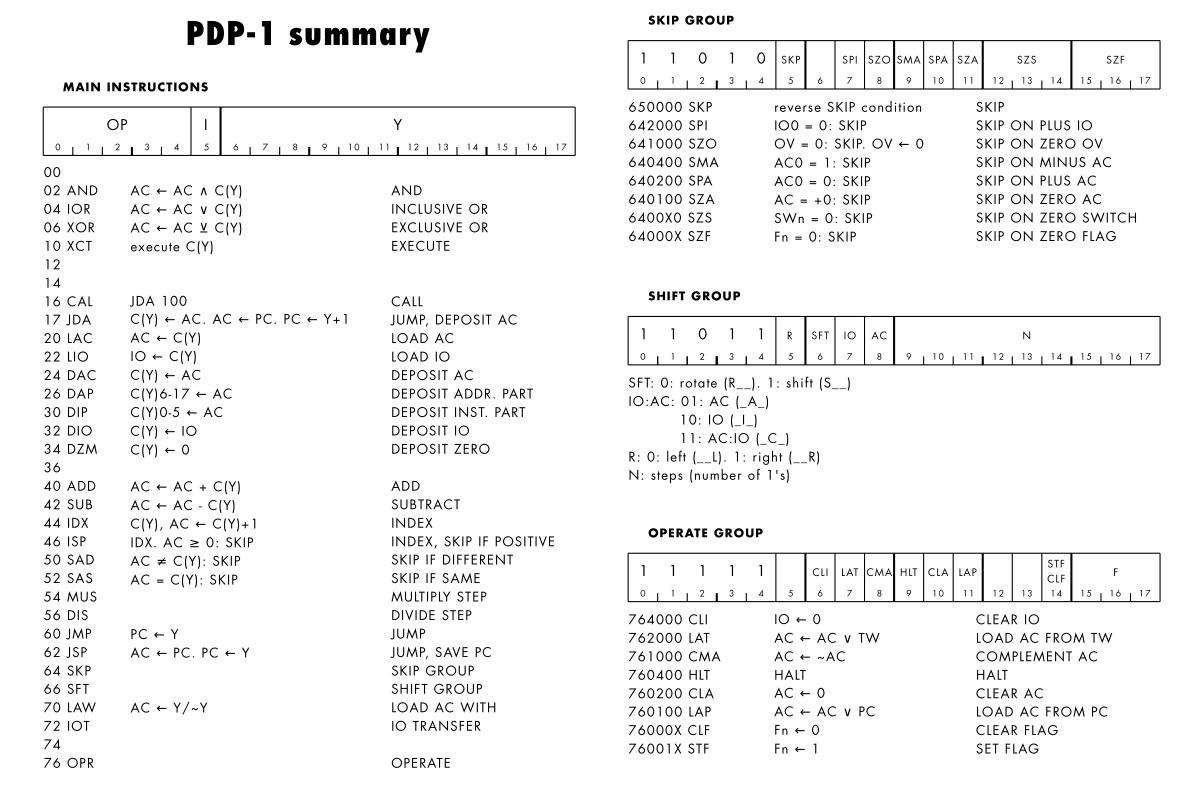 That's the entire computer! You need to know no more than this to read assembly code.
The 1963 version of the PDP-1 Handbook is next. In just the first 20 pages, you get pretty much all there is to know.
From here on, the perfect first steps into writing a little graphics program is on Norbert Landsteiner's masswerk.at site. Specifically, the series of articles in which he develops his PDP-1 ICSS ('computer space') game. Written as a step by step introduction to programming PDP-1 graphics, it is perfect:
Masswerk: the quickest start to programming some graphics
And just to see what is out there in terms of graphics and games, see the PDP-1 Games & Display Hacks page. They all come with source code in /opt/pidp1/tapes/sources.
Lastly, do not forget the AI assistant a few sections below. With that, you can paste code snippets into the AI and ask it to explain what it does and how it works. Very effective.
PDP-1: AI programming assistant & example code
This is work in progress - under heavy construction but regularly updated as we progress with the project
We have created some .md text files that you can literally paste into ChatGPT, Claude Code or any other AI, telling the AI to learn about the PDP-1 and become your programming aide. Try this! It gives you a very smart side-kick when writing programs, or understanding them. Just paste one or more of the .md files into the AI, let it process the information, then start asking questions or giving tasks.
- PDP1.md: the text you want to paste into your AI.
- learnings.md: teach the AI to avoid nasty programming pitfalls
- PDP1-inside.md: teach the AI about the inner guts of the PDP-1, which may help when you get stuck with some mysterious bug in your code.
We're writing a book on PDP-1 programming. Until that is out, here are some code snippets you might find useful:
Simple helloworld.mac:
hello
/ above: title line - was punched in human readable letters on paper tape
/ below: location specifier - told assembler what address to assemble to
100/
lup,	lac i ptr		/ load ac from address stored in pointer
	cli			/ clear io register
lu2,	rcl 6s			/ rotate combined ac + io reg 6 bits to the left
				/ left 6 bits in ac move into right 6 bits of io reg
	tyo			/ type out character in 6 right-most bits of io reg
	sza			/ skip next instr if accumulator is zero
	jmp lu2			/ otherwise do next character in current word
	idx ptr			/ increment pointer to next word in message
	sas end			/ skip next instr if pointer passes the end of message
	jmp lup			/ otherwise do next word in message
	hlt			/ halt machine
ptr,	msg			/ pointer to current word in message
msg,	text "hello, world"	/ 3 6-bit fiodec chars packed into each 18-bit word
end,	.         		/ sentinel for end of message
start 100			/ tells assembler where program starts
We left this for the end of this section, and that is wrong. It should be the first thing you go through: the dozens of pages on masswerk.at that take you through the PDP-1, its assembly language, commented source code of many programs. Norbert Landsteiner is the 21st century Godfather of the PDP-1. Spend many hours on his site, treasures are hidden all around it. We will add a more complete summary of them here later on.
Masswerk: the quickest start to programming some graphics